

MicroVM: Navigating Firecracker & Firectl
Unlocking Performance Efficiency in the Cloud
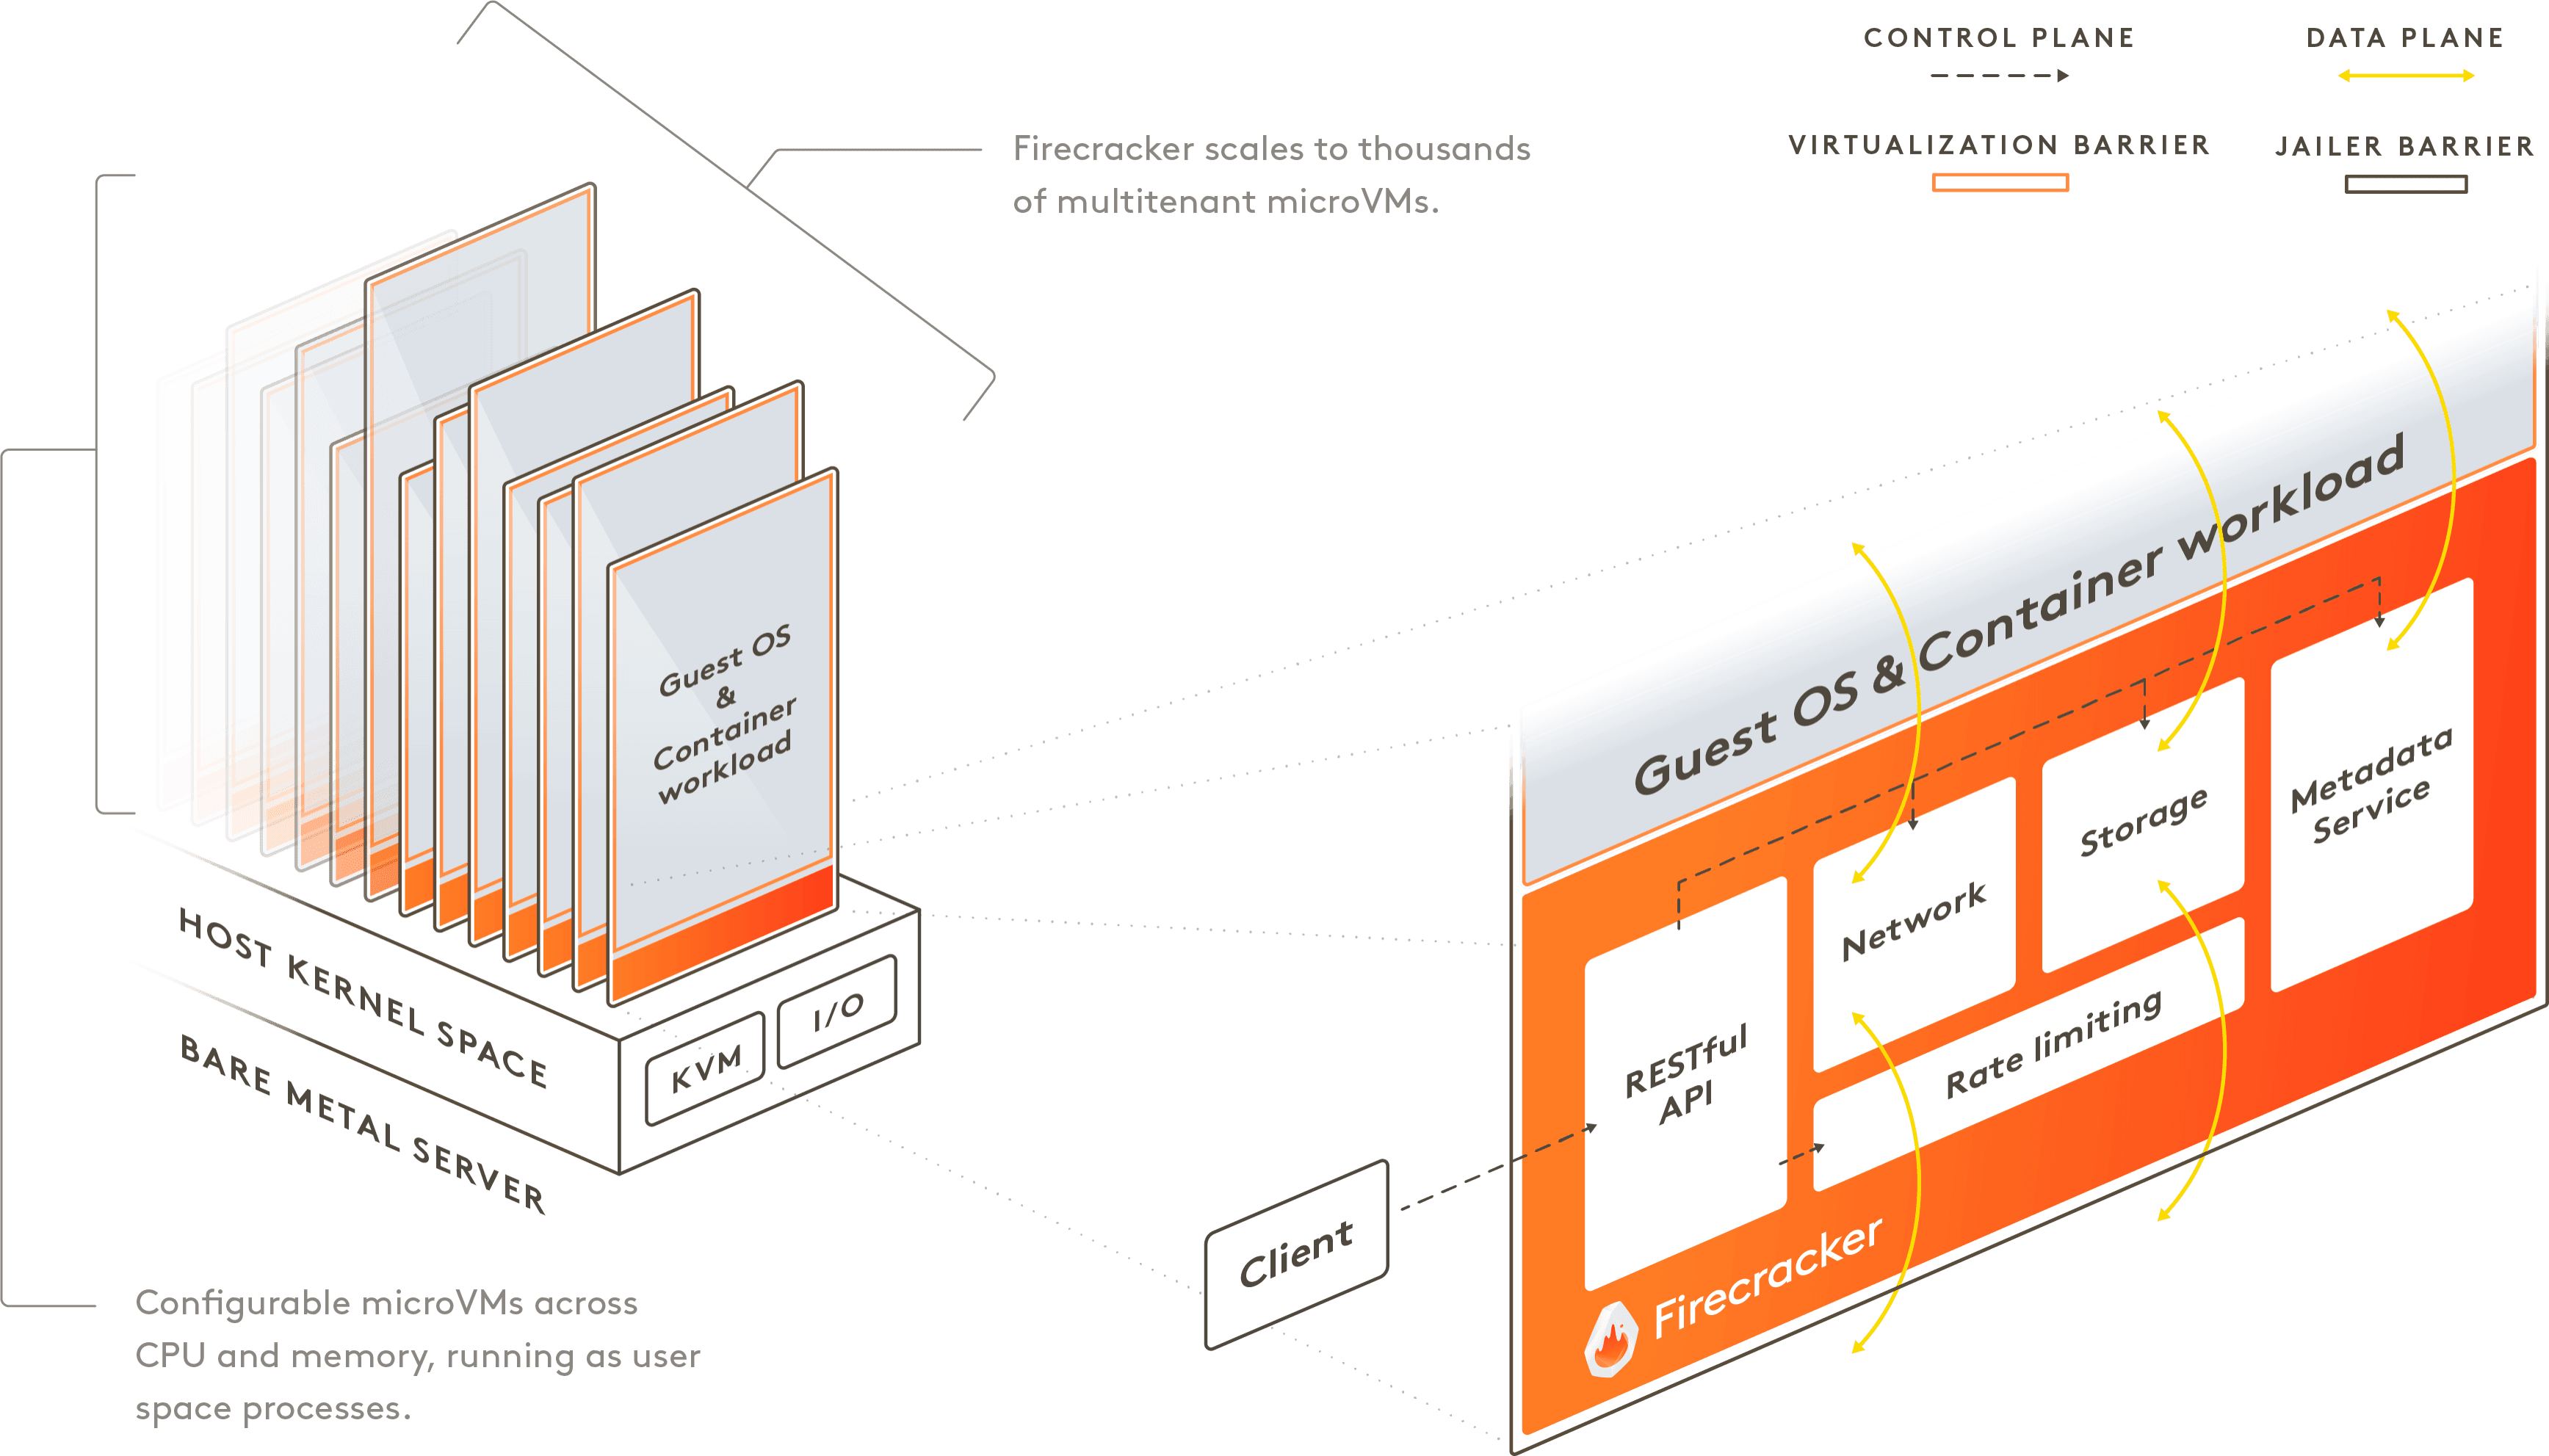
Firecracker is an open-source virtualization technology developed by Amazon Web Services (AWS).
It is designed to enable customers to create and manage secure, multi-tenant container and function-based services that demand high performance, robust isolation, and streamlined resource usage.
Firecracker is built on the benefits of traditional virtual machines while specializing in container-like, short-lived workloads.
Using AWS's Firecracker, you can create micro Virtual Machines (microVMs) with a cloud experience that functions similarly to traditional Virtual Machines (VMs) but with faster startup times and significantly lower overhead.
To manage these microVMs, we use the simple command-line tool called 'firectl'. This article aims to illustrate how to run Firecracker and control it using firectl.
Before you begin, ensure that your environment is set up to support Firecracker. Here are the prerequisites:
A Linux host, either bare metal or a VM running on top of a VMM that exposes /dev/kvm. AWS EC2 instances such as i3.metal and m5d.metal are a good choice.
A CPU with virtualization support.
KVM enabled in your Linux kernel
Installing Firecracker
Step 1: Clone Firecracker Repository
Get the latest version of Firecracker from its GitHub repository using the following command:
git clone https://github.com/firecracker-microvm/firecracker
Step 2: Building Firecracker
Navigate to the firecracker directory and build the project:
cd firecracker
./tools/devtool build
Note that you must have Go installed to use the above command.
This builds Firecracker and places the binary in the ./build/cargo_target/{target_arch}/debug directory.
To find out {target_arch}, you can run uname -m command. It could be x86_64, aarch64, etc.
Step 3: Running Firecracker
To start Firecracker without API request validation (for development purposes only):
./build/cargo_target/{target_arch}/debug/firecracker --api-sock ./build/cargo_target/{target_arch}/debug/api.socket --no-api
Step 4: Testing Firecracker
To ensure that everything is working correctly, run the tests:
./tools/devtool test
Once you've completed building and verifying Firecracker, the next step is running microVMs using 'firectl'.
Installing FireCTL
Step 1: Install firectl
You can install firectl directly from its github repository using the following command:
git clone https://github.com/firecracker-microvm/firectl.git
make release
make install
Step 2: Download a Kernel and a Root Filesystem
Firecracker operates by booting a guest kernel image and runs an optional root filesystem, you'll need to download these to proceed:
curl -fsSL -o hello-vmlinux.bin https://s3.amazonaws.com/spec.ccfc.min/img/hello/kernel/hello-vmlinux.bin
curl -fsSL -o hello-rootfs.ext4 https://s3.amazonaws.com/spec.ccfc.min/img/hello/fsfiles/hello-rootfs.ext4
Step 3: Start the Firecracker VMM (Virtual Machine Monitor)
This can be done using the firecracker command line from the location where the binary is situated:
screen -dmS firecracker /YOUR_PATH_TO_FIRECRACKER_BINARY/firecracker --api-sock /tmp/firecracker.socket
Step 4: Run a VM using Firectl
Once the Firecracker VMM is running, you can execute the following command to run a Firecracker microVM:
firectl --kernel=./hello-vmlinux.bin --root-drive=./hello-rootfs.ext4 --kernel-opts="console=ttyS0 noapic reboot=k panic=1 pci=off nomodules rw" --tap-device=vport0/aa:fc:00:00:00:01
After running the command, you will be inside the guest VM, and you can interact with it.
Note that:
--kernelspecifies the path to the Linux Kernel binary you wish to boot.--root-drivespecifies the path to the root filesystem image.--kernel-optsspecifies the kernel boot options. Standard options include:console=ttyS0directs the kernel console to the serial port, which Firecracker uses for I/O.reboot=k: shuts down the system upon kernel panics.pci=offdisables the PCI bus.nomodulesdisables kernel modules loading.rwmounts the root filesystem as read-write.
--tap-devicecreates a tap device for networking. It accepts<tap-name>/<tap-device's-mac-address>.
To create a TunTap device, you can refer to my previous article where I have explained on how to create such TunTap devices.
These simple steps allow you to run Firecracker microVMs.
Step 5: Interacting with the VM
After the launch, you should be directly connected to the serial console. You can interact with the VM as you would typically do with a Linux terminal.
It's important to note, however, that once the VM has booted up, firectl doesn't provide a way for you to interact with the Firecracker API directly. For any management tasks that involve API interaction, like pausing or resuming the VM, you either need to exit firectl and interact with the API directly, or script the steps using a tool like curl.
To Exit from VM:
Press Ctrl+a followed by d. This sequence allows you to detach from the console.
To Terminate VM:
Enter reboot, and the VM should shut down gracefully after.
Firecracker significantly improves the speed at which your virtual machines boot while reducing the resources needed from your system. It allows you to use your resources more efficiently while also maintaining the performance and isolation of a full VM.
Firectl lets you manage these VMs simply and straightforwardly, making it much easier to work with.
Conclusion
Utilizing Firecracker and Firectl together revolutionizes resource management, optimizing workloads for a range of applications in cloud computing.
Despite their advanced capabilities, proper usage and understanding of these tools are essential for maximum efficiency. Their unique advantages including quicker startup times, reduced overhead, and improved security, are transforming the way we design lightweight, fast, and resource-conscious services in the realm of modern, cloud-native applications.
About Me 👨💻
I'm Faiz A. Farooqui. Software Engineer from Bengaluru, India.
Find out more about me @ faizahmed.in


